9. Get Data from Folder: Monthly Bank Statements Walkthrough
9.4 Combine Files and the Helper Queries
Start with a problem
Shraddha has three statement files filtered and ready. She wants one table of all transactions without opening each file.
Explain simply
Combine Files builds a function from one sample file and runs it on every file. It adds Source.Name, so you always know which file a row came from.
Show the data
Filtered folder list from 9.3:
| Name | Extension |
|---|---|
| Feb.xlsx | .xlsx |
| Jan.xlsx | .xlsx |
| Mar.xlsx | .xlsx |
About this data: This table uses columns: Name, Extension. This table uses columns: Query, What you see. This table uses columns: Name, Extension, Rows inside. This table uses columns: Source.Name, Date, Narration, Debit (₹). Values shown are the lesson examples already on this page (not a new dataset).
Fictional sample data. Practice file: bank_statements/Jan.xlsx, bank_statements/Feb.xlsx, bank_statements/Mar.xlsx, bank_statements/notes.txt (source: src/practice/).
Demonstrate
- Click the Combine Files icon (two down-arrows) on the Content column header.
-
In Combine Files, Sample File = First file. This is the file in the first row of your list (with these names, usually Feb.xlsx, because the list is sorted by name). Select the sheet Statement › OK.
Your result should look like this:
Queries pane Transform File from Bank Transactions › Parameter1, Sample File, Transform Sample File, Transform File (fx) -
Select the combined query Bank Transactions and look at the first column.
Your result should look like this:
Source.Name values Feb.xlsx, Jan.xlsx, Mar.xlsx (many rows each, because the title rows are still inside) -
Do not clean in the combined query yet. Power Query may have added a Promoted Headers or Changed Type step; you will replace them in 9.5, inside Transform Sample File.
Show the result
Your result should look like this (fictional sample):
| Query | What you see |
|---|---|
| Bank Transactions | Source.Name plus the raw sheet columns; title, Opening/Closing Balance and End of Statement rows still present |
| Transform Sample File | The sample file's Statement sheet: the place to clean |
| Transform File | A function (fx): leave it alone |
Explain what happened
Power Query turned the steps of Transform Sample File into the function Transform File, called it once per file, and stacked the results under Source.Name.
Explore further
- Combine & Transform Data in the first dialog does the same in one go, but you skip the filter step. That is riskier.
- For a folder of CSV files, the sample uses
Csv.Documentinstead ofExcel.Workbook.
Detailed reference for this lesson:
Combine files from a folder in Power BI with example — in 30 seconds
What: Combine Files takes every file in a folder and stacks them into one table. The file name goes into a Source.Name column.
Why: A new statement arrives every month. You drop it in the folder and press Refresh. No copy-paste.
Tiny example: Jan.xlsx has 2 rows, Feb.xlsx has 2 rows, Mar.xlsx has 1 row. After Combine you get one table with 5 rows.
Combine files from a folder in Power BI with example — 30 सेकंदात
काय: Combine Files folder मधल्या सगळ्या files एकाखाली एक लावून एक table बनवतो. File चं नाव Source.Name column मध्ये येतं.
का: दर महिन्याला नवीन statement येतं. ते folder मध्ये टाका आणि Refresh दाबा. Copy-paste नाही.
छोटं उदाहरण: Jan.xlsx मध्ये 2 rows, Feb.xlsx मध्ये 2 rows, Mar.xlsx मध्ये 1 row. Combine नंतर 5 rows चा एक table मिळतो.
Combine files from a folder in Power BI with example — 30 सेकंड में
क्या: Combine Files folder की सारी files एक के नीचे एक लगाकर एक table बनाता है. File का नाम Source.Name column में आता है.
क्यों: हर महीने नया statement आता है. उसे folder में डालिए और Refresh दबाइए. Copy-paste नहीं.
छोटा उदाहरण: Jan.xlsx में 2 rows, Feb.xlsx में 2 rows, Mar.xlsx में 1 row. Combine के बाद 5 rows की एक table मिलती है.
First look at the data (before → after):
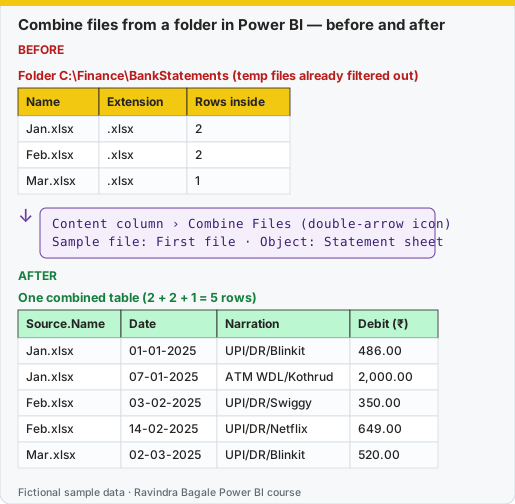
Same before / after tables as text
Before — Folder C:\Finance\BankStatements (temp files already filtered out)
| Name | Extension | Rows inside |
|---|---|---|
| Jan.xlsx | .xlsx | 2 |
| Feb.xlsx | .xlsx | 2 |
| Mar.xlsx | .xlsx | 1 |
Formula / click path
Content column › Combine Files (double-arrow icon)
Sample file: First file · Object: Statement sheet
After — One combined table (2 + 2 + 1 = 5 rows)
| Source.Name | Date | Narration | Debit (₹) |
|---|---|---|---|
| Jan.xlsx | 01-01-2025 | UPI/DR/Blinkit | 486.00 |
| Jan.xlsx | 07-01-2025 | ATM WDL/Kothrud | 2,000.00 |
| Feb.xlsx | 03-02-2025 | UPI/DR/Swiggy | 350.00 |
| Feb.xlsx | 14-02-2025 | UPI/DR/Netflix | 649.00 |
| Mar.xlsx | 02-03-2025 | UPI/DR/Blinkit | 520.00 |
Do it step by step:
- Filter the folder list first: Extension =
.xlsx, and Name does not begin with~$. - Click the double-arrow icon on the Content column header.
- In Combine Files, keep First file as the sample. Click the Statement sheet. Click OK.
- Look at the Queries pane. A group Transform File from BankStatements appears with helper queries.
- Check the first column. Source.Name shows Jan.xlsx, Feb.xlsx and Mar.xlsx.
- Check the row count at the bottom: 5 rows for this sample.
एक-एक step करून बघा:
- आधी folder list filter करा: Extension =
.xlsx, आणि Name~$ने सुरू होत नाही. - Content column header वरच्या double-arrow icon वर click करा.
- Combine Files मध्ये sample म्हणून First file ठेवा. Statement sheet वर click करा. OK करा.
- Queries pane बघा. Helper queries सोबत Transform File from BankStatements हा group दिसतो.
- पहिला column तपासा. Source.Name मध्ये Jan.xlsx, Feb.xlsx आणि Mar.xlsx दिसतात.
- खाली row count तपासा: या sample साठी 5 rows.
एक-एक step करके देखिए:
- पहले folder list filter कीजिए: Extension =
.xlsx, और Name~$से शुरू नहीं होता. - Content column header के double-arrow icon पर click कीजिए.
- Combine Files में sample के रूप में First file रखिए. Statement sheet पर click कीजिए. OK कीजिए.
- Queries pane देखिए. Helper queries के साथ Transform File from BankStatements group दिखता है.
- पहला column जाँचिए. Source.Name में Jan.xlsx, Feb.xlsx और Mar.xlsx दिखते हैं.
- नीचे row count जाँचिए: इस sample के लिए 5 rows.
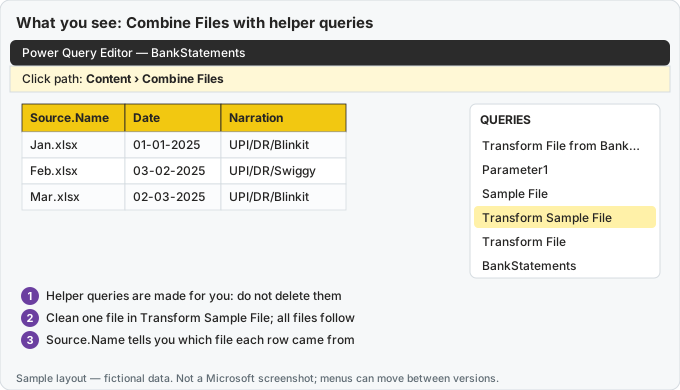
What you should see on screen after the steps (sample layout — fictional data, not a Microsoft screenshot).
Steps in Power BI
- Click the Combine Files button (two down-arrows) in the header of the Content column.
- In the Combine Files dialog, Sample File: First file (the file in the first row of the list; with Jan/Feb/Mar names that is usually Feb.xlsx, because the list is sorted by name). In the left list, select the sheet Statement (choose a sheet by name, not "Parameter1" object index) › OK.
- Power Query creates a group Transform File from BankStatements with helper queries, plus the combined query (rename it Bank Transactions).
| Helper query | What it is | What you do with it |
|---|---|---|
| Parameter1 | A parameter of type Binary that holds one file's content | Nothing – leave it |
| Sample File | The content of the first file in the list (e.g. Feb.xlsx) | Nothing – it feeds the parameter |
| Transform Sample File | A normal query that opens the sample file's Statement sheet | Put all per-file cleaning steps here – you see the data while you work |
| Transform File | A function generated from Transform Sample File | Nothing – it updates automatically and is called once per file |
| Bank Transactions (combined) | Calls Transform File for every file and expands the results; adds Source.Name | Steps that apply to the combined table (month, types, categories) |
Where do I clean?
Anything that depends on the layout of one file (title rows, header row, end markers, renaming headers) goes into Transform Sample File. Anything about the combined data (month column, final types, categories, dedupe across files) goes into the combined query.
Do not panic when you see the helper queries – Power BI made them for you. Just do not touch them.
Helper queries बघून घाबरू नका – Power BI ने ते तुमच्यासाठी बनवलेत. फक्त त्यांना हात लावू नका.
Helper queries देखकर घबराइए मत – Power BI ने वे आपके लिए बनाई हैं. बस उन्हें हाथ मत लगाइए.
Ravindra Bagale's Tip
Friends, many students delete or rename the helper queries (Parameter, Sample File, Transform File) because they look like clutter, and the combine stops working. Leave them alone and put them in a group. If you need to tidy up, rename the group, not the helper queries. It's very simple – just make it a habit.
Ravindra Bagale's Tip – मराठी
मित्रांनो, helper queries (Parameter, Sample File, Transform File) पसारा वाटतात म्हणून बरेच students त्या delete किंवा rename करतात, आणि combine चालायचं थांबतं. त्यांना हात लावू नका, एका group मध्ये ठेवा. आवराआवर करायची असेल तर group rename करा, helper queries नाही. एकदम simple आहे, फक्त सवय लावून घ्या.
Ravindra Bagale's Tip – हिंदी
दोस्तों, helper queries (Parameter, Sample File, Transform File) फ़ालतू लगती हैं इसलिए बहुत से students उन्हें delete या rename कर देते हैं, और combine काम करना बंद कर देता है. उन्हें मत छेड़ो, एक group में रख दो. सफ़ाई करनी हो तो group का नाम बदलो, helper queries का नहीं. बहुत आसान है, बस आदत बना लो.
Fix common mistakes
| Wrong result | Reason | Correction |
|---|---|---|
| Only one month looks clean; the others are still messy | Cleaning steps were added in the combined query for one file's layout | Clean in Transform Sample File, so every file gets the same steps |
| You expected Jan.xlsx to be the sample | First file = first row of the list, sorted by name | Check the Name column; name files 2026-01.xlsx if the order matters |
| The combine stopped working after tidying the Queries pane | Helper queries deleted or renamed | Leave the helper group alone; just collapse it |
Practise independently
Practice task
If you rename the files 2026-01.xlsx, 2026-02.xlsx and 2026-03.xlsx, which file becomes the sample, and why is that better?
Hints
- Think about how the names sort.
Solution
2026-01.xlsx (January), because 2026-01 sorts first. The sample is predictable, the months sort correctly, and the year is in the name.
Think like a professional
Pick a sample file whose layout is typical. If the first file is unusual (like Mar.xlsx with extra columns), the generated function is built around the wrong layout.
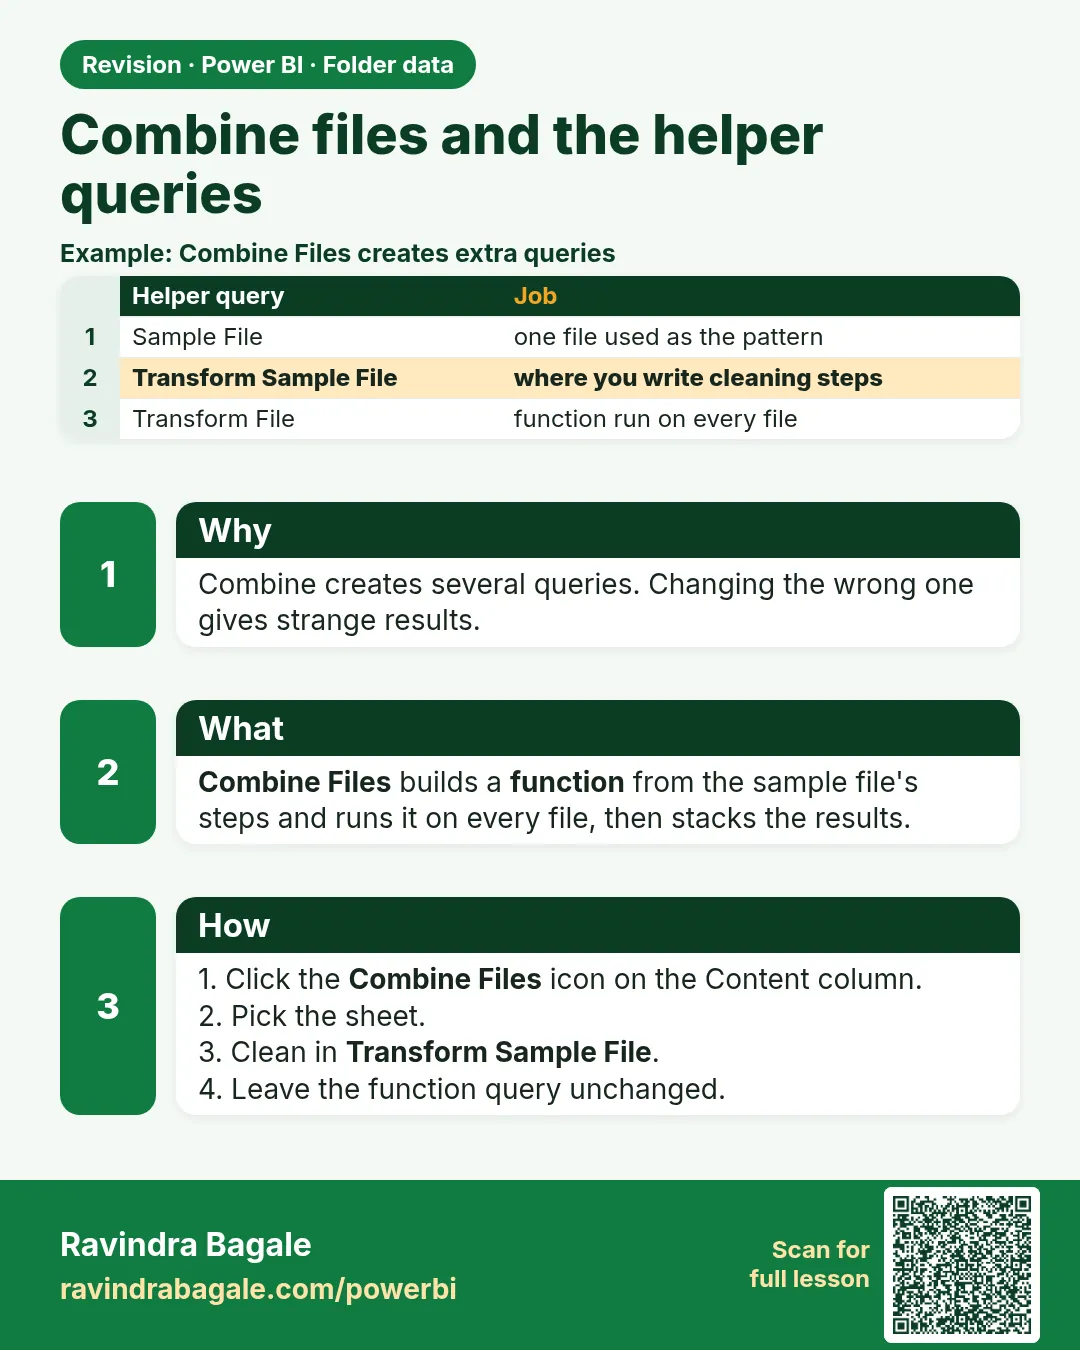 Revision card
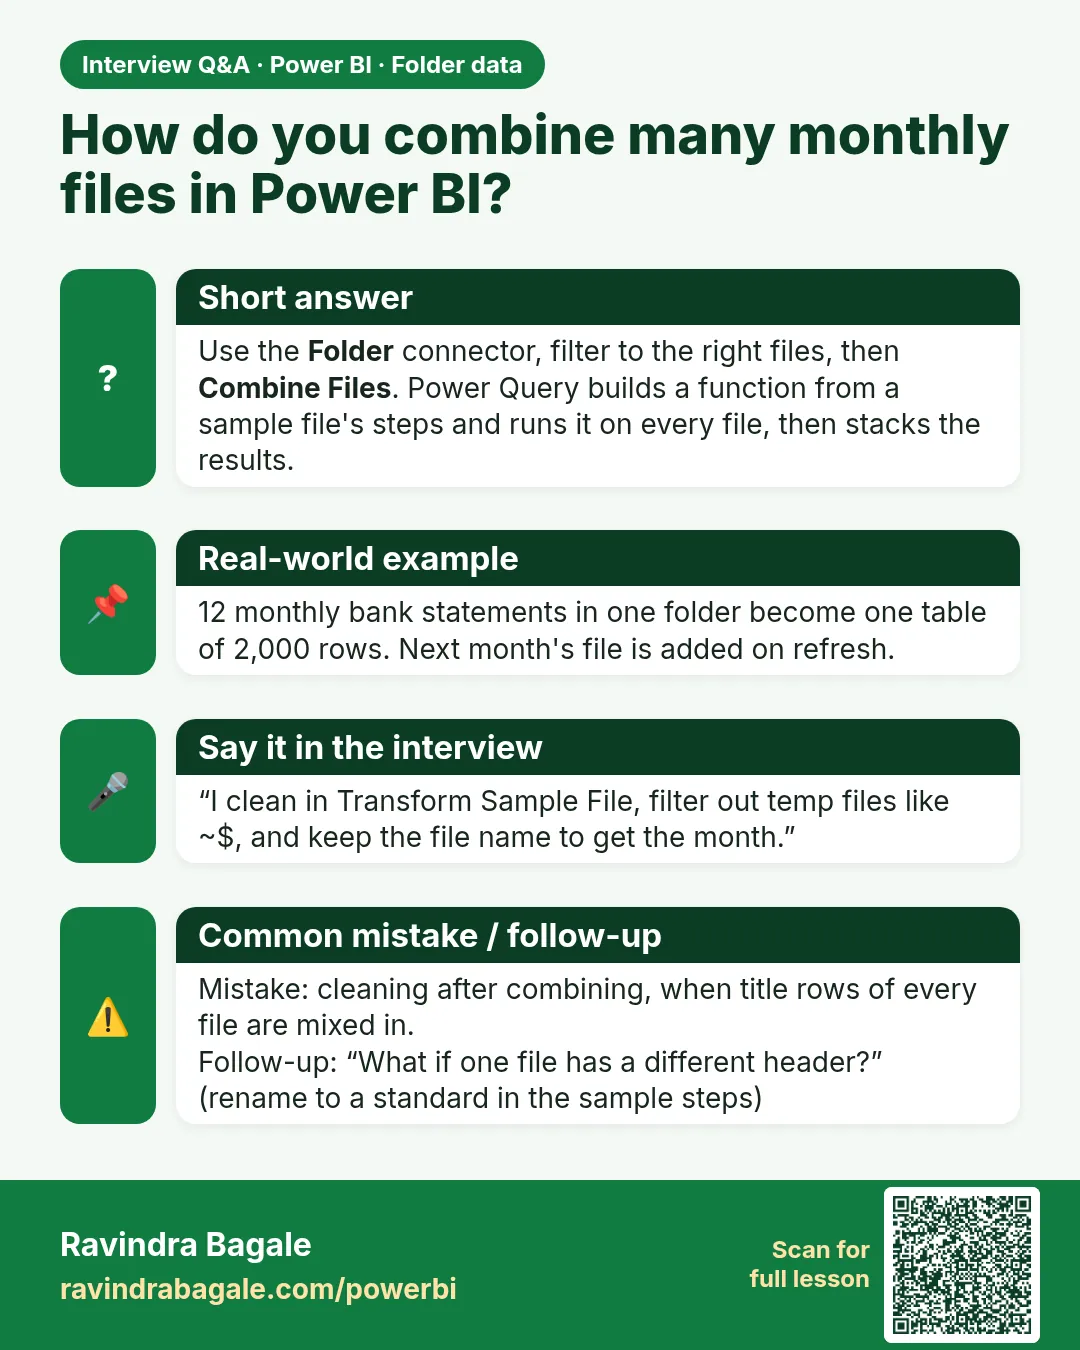 Interview card