Root user, IAM users, MFA and launching your first EC2 server
Let's start. So far we learnt IP addresses, ports, and how AWS spreads its data centers across Regions and Availability Zones. Today we open the AWS console for real. First we learn who should sign in and how: the root user, IAM users and MFA. Then we look at the free credits, the bill and the Region selector. And at the end we launch our first EC2 server in seven steps, and delete it again so it costs nothing. Read slowly, and try every step in your own account.
What you will learn in this class
- Why you must practise in your own AWS account
- The console sign-in screen
- Root user and IAM user: who is who
- Least privilege: give each person only what they need
- Accountability: why 1000 people must never share one login
- Mark's setup: root once, then an admin IAM user, then one IAM user per employee
- Why you don't use root every day, and the IAM safety net
- Signing in as root or as an IAM user
- MFA: passkeys and security keys, authenticator apps, hardware tokens
- Lost MFA device: how to get back in
- Your account ID
- The Free plan and the $200 credits
- Regions in the console, and enabling an opt-in Region
- One global bill, paid later: set a budget alert
- Why we practise in N. Virginia, and economy of scale
- EC2 = Elastic Compute Cloud
- The orange button: think before you click
- The 7 launch steps, one by one
- Launch, check, stop or terminate
- Homework
1. Why practice matters
Why. You can watch a hundred videos about AWS and still freeze when the console shows an error. Errors teach you. You only get errors when you do the steps yourself.
Classroom line
Until you practise yourself and hit errors, you will not understand the concept fully.
Class मधलं वाक्य
"Jo paryant tumhi swata practice karnar nahi, error yenar nahiyet... to paryant purnpane concept samjat nahi."
जोपर्यंत तुम्ही स्वतः practice करणार नाही, errors येणार नाहीत, तोपर्यंत concept पूर्णपणे समजत नाही.
Classroom line
Until you practise yourself and hit errors, you will not understand the concept fully.
What. Every student needs an own AWS account. Not a friend's account, not the trainer's screen.
How.
- Open an AWS account today, with your own email address.
- Keep a notebook. Every time you see an error, write the error and the fix.
- Do each step of this chapter in your account, the same day.
Worked example: why one demo is not enough.
- Suppose you watch the trainer launch 1 server.
- You launch the same server yourself 5 times, on 5 different days.
- On day 2 you forget the key pair. On day 4 you pick the wrong Region and can't find your server.
- That is 2 real errors you fixed yourself. In an interview, those 2 stories are worth more than the 1 demo you watched.
Which sign-up option?
In 2026 AWS started showing some new customers two ways to sign up: Sign up for AWS (new) and Sign up for AWS (advanced). For this course choose Sign up for AWS (advanced). Only that kind of account has a root user, IAM users who sign in to the console, a Region you choose yourself and opt-in Regions, which is everything we use below. If you only see one sign-up page, you are already on the normal path.
2. The console sign-in screen
Why. Before any server, you must get into the AWS Management Console, the website where you click to create things.
What. Search "AWS management console sign in", or open https://console.aws.amazon.com/. The board showed the screen like this:
- A box for the IAM user name.
- A box for the Password.
- A Sign in button.
- A link: Sign in using root user email.
There is one more box the board didn't show: an IAM user also needs the account ID or account alias, so AWS knows which account the user name belongs to. Your browser often remembers it, which is why it may not appear. We see both screens in section 8.
How (first time, with a new account).
- Open the console sign-in page.
- Click Sign in using root user email (on some screens: choose Root user).
- Type the email you signed up with, then the password.
- Set up MFA when AWS asks (section 9). AWS now requires MFA for the root user.
3. Root user and IAM user: who is who
Why. One AWS account is often used by many people. AWS needs a way to tell "the owner" apart from "people working inside the account".
What.
- The root user is the identity created when someone opens the account with an email address and password (and, when AWS asks, a payment method). It has complete access to everything in the account, and nobody can limit it.
- An IAM user is a separate login that is created inside the account. IAM means Identity and Access Management. An IAM user can do only what it is allowed to do.
- An IAM user does not need its own email address. The admin chooses a user name, such as
satish.
Classroom line
Whoever opens the account using their email ID and a credit card, debit card or UPI payment option, we call the root user.
Class मधलं वाक्य
जो स्वतःचा email ID आणि credit card, debit card किंवा UPI payment वापरून account उघडतो, त्याला आपण root user म्हणतो.
Classroom line – हिंदी
"Jo apna email id use karke aur credit card ya debit card ya upi payment option use karke account open karta hai usko hum kahenge root user."
The board example (suppose). Suppose a big social media app runs on AWS. It has lakhs of servers and thousands of employees. Suppose its founder, Mark, opened the AWS account with the email r@b.com. (This is only a suppose example to learn with. We are not saying any real company runs this way.)
r@b.comis the root user. That is Mark, the owner.- Mark signs in as root, creates an IAM user called
markfor himself with full admin rights, and signs out of root. - Everyone else (developers, testers, support people) gets an IAM user. Nobody else ever gets the root email and password.
Classroom line
Apart from the owner, all the other people will each get an IAM user that we create for them.
Class मधलं वाक्य
Owner सोडून बाकी जेवढे लोक आहेत, त्या सगळ्यांना आपण IAM user बनवून देणार.
Classroom line – हिंदी
"Owner chhod ke jitne bhi log... un sabhi logo ko hum IAM user create karke denge."
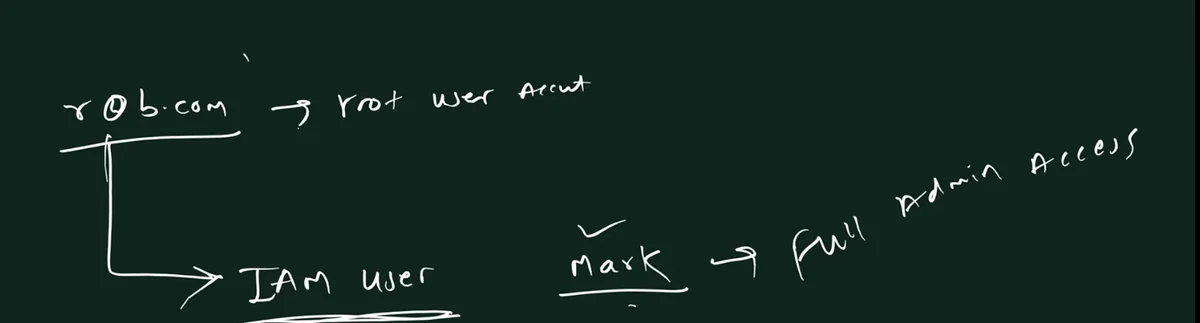
From the class board: r@b.com is the root user of the account. From it, Mark creates an IAM user "Mark" with full admin access, and uses that IAM user every day.
Figure 1. Suppose Mark opens an AWS account: the root user r@b.com is used once to create the admin IAM user mark, who then creates one IAM user per employee with only the permissions that person needs.
Correction
In class the IAM password example was 123456. Never use a password like that. Use a long password from a password manager, and MFA on top.
4. Least privilege: give each person only what they need
Why. The more power a login has, the more damage a mistake or a thief can do with it. So each person gets only the permissions they need for their job. This is called least privilege.
What can be controlled? AWS has more than 200 services. On the board we used five of them:
| Service | What it is | Board meaning |
|---|---|---|
| Amazon EC2 | virtual servers | "server" |
| Amazon EBS | disks attached to EC2 servers | "hard disk" |
| Amazon S3 | object storage for files | "images and videos" |
| Amazon RDS | managed databases | "database" |
| Elastic IP | a static public IPv4 address | "static IP" |
And one more word from class: an AMI (Amazon Machine Image) is the template a server is launched from: the operating system plus any software. It is not "a backup". The disk backups are called snapshots.
Worked example: the board account (suppose numbers).
- Suppose the account has 100 EC2 servers, 20 S3 buckets and 10 databases.
- IAM user
satishis allowed: start and stop up to 10 EC2 servers. Not allowed: delete servers, open any database. - If
satishtries to delete a server, AWS answers Access denied. - Out of 100 + 20 + 10 = 130 resources, satish can touch only 10. That is 10 ÷ 130 ≈ 7.7% of the account.
Why data gets the strictest rules. For many companies the database is the most valuable thing they own: customers, orders, payments.
Classroom line
If he gets a thousand, it means nothing to him. But if someone says "I'll give you 10 crore rupees", he will take the risk.
Class मधलं वाक्य
त्याला हजार रुपये मिळाले तर त्याला काही वाटणार नाही. पण कोणी "10 कोटी रुपये देतो" म्हटलं, तर तो risk घेईल.
Classroom line – हिंदी
"Agar usko hazar mil rahe hai, usko kuch nahi lagega... 10 crore rupaye dunga... wo risk lega."
- Suppose a competitor offers one employee 10 crore rupees for a copy of the customer database.
- If 500 employees can read the database, you have 500 chances of one bad decision.
- If only 3 trusted people can read it, you have 3 chances. That is 500 ÷ 3 ≈ 167 times fewer.
- So database access goes to 2 or 3 trusted people only.
More limits: time and place. Many companies also limit when and from where people can work:
- Time: allowed only from 9 AM to 6 PM.
- Place: allowed only from the office network (the office's public IP address) or a company laptop.
In AWS, IAM policies can do this with conditions, for example aws:SourceIp (which IP address the request comes from) and aws:CurrentTime (when the request is made).
Correction
In class the number of AWS services was given as "500+". AWS itself says more than 200 fully featured services. The market-share percentages from class are dropped: market share numbers change every quarter and depend on who measures. Just say that AWS is the largest cloud provider.
5. Accountability: why 1000 people must never share one login
Why. One day something goes wrong. The company must be able to answer one question: who did it?
The board question. Suppose 1000 people all sign in with the same root email and password. One morning, 1000 servers are deleted.
Classroom line
...then how will you find out who deleted it?
Class मधलं वाक्य
"...tar tumhi kase olakhnar ki te koni delete kela ahe?"
...मग तुम्ही कसं ओळखणार की ते कोणी delete केलं?
Classroom line
...then how will you find out who deleted it?
The class tried four answers:
- Time. Everyone signs in between 9:00 and 9:15. The delete happened at 9:07. That fits all 1000 people.
- IP address. Everyone works from the same office, so AWS sees the same office public IP for all 1000.
- MAC address. This doesn't work at all. A MAC address stays inside your local network; it never reaches AWS over the internet.
- Logs. AWS keeps a record of actions (AWS CloudTrail). But every line says the same thing: root.
Result: 4 answers, 0 names.
What. Give every person their own IAM user. Now every action carries a name.
Worked example.
- Same 1000 people, but each has an own IAM user.
- The record shows: 09:07, user
satish, terminate instances, ×1000. - Time, IP and the log are not needed to guess any more. The name is in the record.
- 1000 suspects become 1 person who has to explain.
Figure 2. Left: 1000 people share the root login, and the record only says "root". Right: everyone has an own IAM user, and the record names satish.
6. Mark's setup: root once, then IAM users for everyone
Why. Now we put sections 3 to 5 together into the real order of work.
How (the board steps).
- Mark opens the account with
r@b.com. That is the root user. - Mark signs in as root, ideally only this once for daily work, and turns on MFA for root.
- Mark creates an IAM user
markwith full admin rights (the AWS managed policy AdministratorAccess). - Mark signs out of root and signs in as IAM user
mark. - As
mark, he creates IAM users for the employees:satish,mahesh,ravi,raja,rani. - For each one he sets a first password and ticks "User must create a new password at next sign-in".
- He sends each employee three things: the console sign-in link for the account, the user name, and the first password.
- At first sign-in each employee must choose a new password. Now only the employee knows it.
Classroom line
You must make them change the password; it is compulsory.
Class मधलं वाक्य
त्यांना password बदलायला लावायचाच, ते compulsory आहे.
Classroom line – हिंदी
"compulsory unko password change karne dena hai"
Why force the password change? Accountability again.
- Suppose Mark sets
satish's password and satish never changes it. - Now 2 people know satish's password: satish and Mark.
- If a server is deleted from the satish login, satish can say "maybe Mark did it". Nobody can prove otherwise.
- After the forced change, only 1 person knows the password. The login, and the action, belong to satish alone.
When is root still needed? AWS lists a few tasks that only root can do. For a normal account, for example: changing the root email or root password, closing the account, and restoring permissions if the only admin locked himself out. For everything else, use an IAM user.
7. Why you don't use root every day, and the IAM safety net
Why. Root can do everything, including changing the account's email and phone. If a thief gets root, the account can stop being yours.
The board story: one careless click.
- Mark uses root every day.
- One day the browser asks "Save password?" and he clicks Save by mistake.
- Later his laptop gets malware, a bad browser extension or a keylogger. It reads the saved password.
- The hacker signs in as root and changes the root password.
- The hacker deletes servers and databases.
- The hacker changes the account email and phone number.
- Like someone changing the nominee on your bank account, now the recovery messages go to the hacker. Proving that the account is yours becomes very hard and very slow.
The safety net. Now suppose Mark followed section 6 and works as IAM user mark every day.
- The same malware steals the IAM user
markpassword. - The hacker signs in as
markand starts deleting. - Mark signs in as root (email + password + MFA). The hacker doesn't have these.
- As root, Mark deletes or disables IAM user
mark. The hacker is out at once. - Mark creates a new admin IAM user and changes the passwords.
Classroom line
He will simply delete the IAM user whose account was hacked.
Class मधलं वाक्य
ज्या IAM user चं account hack झालं, तो IAM user च तो delete करून टाकेल.
Classroom line – हिंदी
"jo IAM user ka account hack hua hai us IAM user ko hi delete kar dega"
Figure 3. Animation: the IAM user password is stolen, the hacker signs in, the real owner signs in as root with MFA, and root deletes the hacked IAM user. This works only because root is kept separate and unused.
Worked example: count the keys.
- With root used daily: the thief needs 1 thing, the saved root password. Lose it, lose the account.
- With IAM daily and root locked away with MFA: the thief needs the root email + the root password + your MFA device. That is 3 things, and the root password was never saved in the browser.
Ravindra Bagale's Tip
Never click "Save password" for AWS root in any browser. Keep root details in a password manager, with MFA. Use an IAM user for daily work.
8. In a company you get IAM, not root; and how each one signs in
Why. When you join a company, nobody will hand you the root login. You must know how to sign in as an IAM user.
Classroom line
The company belongs to someone else; you are an employee, so you will get only an IAM user name and password.
Class मधलं वाक्य
Company दुसऱ्याची आहे, तुम्ही employee आहात, त्यामुळे तुम्हाला थेट IAM user चं user name आणि password च मिळणार.
Classroom line – हिंदी
"company dusre ki hai, aap employee ho, toh aapko directly IAM user ka user name aur password hi milega"
In class. While you learn, in your own account, you will sign in as root for the first days, with MFA turned on. As soon as you are comfortable, create an admin IAM user for yourself and use that.
What. The two sign-in paths:
| Root user | IAM user | |
|---|---|---|
| Who | the account owner | everyone else |
| Step 1 | email address | account ID (12 digits) or account alias |
| Step 2 | password (sometimes a CAPTCHA) | IAM user name + password |
| Step 3 | MFA (always for root) | MFA, if the admin set it (they should) |
The sign-in link. Admins usually send IAM users a link that already contains the account, in this form: https://<account-ID-or-alias>.signin.aws.amazon.com/console. With that link the account ID box is filled in for you.
Figure 4. Root user sign-in: email, password and MFA. IAM user sign-in: account ID or alias, user name and password, then MFA. 111122223333 is AWS's own example account ID.
9. MFA: three types
Why. A password alone can be stolen (section 7). MFA (multi-factor authentication) adds a second proof: something you have, like your phone or a small key. A thief with only your password still can't sign in.
What. AWS now requires MFA for the root user. You can also turn it on for every IAM user. Each user can register up to 8 MFA devices. The board listed three types:
Type 1. Passkeys and security keys.
- A passkey lives in your phone's or laptop's password manager (Apple, Google, Microsoft and others). You unlock it with your fingerprint, face or PIN. You can also scan a QR code with your phone to sign in on a laptop.
- A security key is a small physical device, about the size of a pen drive, that you plug in or tap.
- AWS recommends these first: they are phishing-resistant, so a fake login page can't trick them.
Prices of security keys vary a lot by model and seller; check before you buy.
Type 2. Authenticator app (virtual MFA).
- Install an authenticator app, for example Google Authenticator or Microsoft Authenticator.
- In AWS, choose authenticator app, and scan the QR code with the app.
- The app now shows a 6-digit code that changes every 30 seconds. Type the current code at sign-in.
Type 3. Hardware TOTP token. A small device that looks like a digital watch or a key-ring tag. It shows a 6-digit code on its own screen. AWS accepts only tokens bought through the links on AWS's MFA page, because AWS must know each token's secret.
How does a code appear without internet? This is the part the board got wrong.
- When you scan the QR code, the app and AWS both store the same secret seed. (A hardware token gets its seed at the factory, and AWS gets a copy.)
- Every 30 seconds, the app takes the seed + the current time and runs a fixed formula called TOTP (time-based one-time password).
- AWS runs the same formula with the same seed and the same time.
- Same seed + same time = same code. If your code matches, you are in.
- No satellite, no internet, no SMS. The token works fully offline.
Worked example: why guessing doesn't work.
- A 6-digit code has 10 × 10 × 10 × 10 × 10 × 10 = 1,000,000 possible values.
- A new code comes every 30 seconds, so a day has 24 × 60 × 60 ÷ 30 = 2,880 codes.
- A thief who guesses once has a 1 in 1,000,000 chance, and the code is useless 30 seconds later.
Figure 5. Animation: the app (or token) and AWS share one secret seed. Each works out the same 6-digit code from the seed and the current time, so the codes match. The real code changes every 30 seconds; the animation is sped up.
Why not SMS OTP?
- Other apps on a phone can sometimes read incoming SMS codes.
- In a SIM swap, a criminal gets your number moved to a new SIM and receives your SMS.
- AWS no longer lets you turn on SMS MFA at all. Use one of the three types above.
Correction
In class the hardware token's codes were said to come from a satellite. They don't. The token has a secret seed and a clock inside, and computes each code itself with the TOTP formula. AWS has the same seed and checks the code.
10. Which MFA to choose, and keeping a backup
Why. MFA protects you only if you don't lose it. A lost phone with no backup can lock you out.
What. Comparing the three:
| Type | Phishing-resistant | Needs a battery | Lost or stolen risk |
|---|---|---|---|
| Passkey / security key | yes | security key: no | keep a second one |
| Authenticator app | no | phone | turn on backup or sync |
| Hardware TOTP token | no | yes | physical theft |
How (what the class recommended, made safe).
- For your practice account, an authenticator app is fine and free.
- Turn on the app's backup or sync (for example, Google Authenticator signed in to your Google account), so codes come back on a new phone.
- Better: register 2 devices, for example the app on your phone + a passkey on your laptop. If one is lost, you sign in with the other.
- A hardware token is very safe from online attacks, but it can be physically stolen. Keep it locked away.
11. Lost your MFA device? How to get back in
Why. Phones break and get lost. You need a plan before it happens.
Root user (AWS's own steps).
- Sign in as root with your email and password.
- On the MFA page choose Troubleshoot MFA (it may say "Troubleshoot your authentication device").
- Choose Sign in using alternative factors.
- Verify your email: AWS sends a message; click the link in it.
- Verify your phone: AWS calls your account's primary contact number; type the 6-digit number shown on the screen into your phone's keypad.
- You are in. Remove the old MFA device and add a new one.
- If the device was stolen, also change the root password.
If you can't get the email or the phone call, then you contact AWS Support.
IAM user.
- You can't reset your own MFA.
- Ask your admin (the person who gave you the user name). The admin deactivates your old device.
- Sign in and register a new device.
Worked example: why 2 devices save the day.
- You registered 2 MFA devices: phone app + laptop passkey.
- Your phone is lost. You sign in with the passkey: 1 minute.
- With only 1 device you would need the email check + the phone call, and if the phone number is the lost phone's SIM, you would wait for a new SIM first.
Correction
In class the fix for a lost MFA device was "call AWS Support, they ask which servers and Regions you used". The real first step for root is Sign in using alternative factors (email check + phone call), and for an IAM user it is the admin. AWS Support is the last step, when both checks fail.
12. Your account ID
Why. Every AWS account has a unique number. IAM users need it to sign in, and AWS Support asks for it.
What.
- The account ID is a 12-digit number, for example AWS's own sample
111122223333. - You see it in the account menu at the top right of the console.
- An account alias is a friendly name you can set instead, used in the sign-in link.
Worked example. 12 digits give 10¹² = 1,000,000,000,000 possible IDs. That is room for a lot of accounts.
Ravindra Bagale's Tip
Your account ID is not a password, but don't post screenshots that show it (top right of the console, or in the browser address bar). Together with a user name it makes guessing easier. Crop it out before you share.
13. The Free plan and the $200 credits
Why. You want to learn without a surprise bill. AWS's Free Tier changed in July 2025, so old blog posts and videos are wrong. Here is what AWS's own pages say today (checked October 2026).
What (accounts created on or after 15 July 2025).
- $100 in credits as soon as you sign up.
- Up to $100 more: $20 for each of 5 activities in the "Explore AWS" box on the Console Home page:
- Launch an instance using Amazon EC2.
- Set up a cost budget using AWS Budgets.
- Use a foundation model in the Amazon Bedrock playground.
- Create a web app using AWS Lambda.
- Create an Amazon RDS database.
- You choose a Free plan or a Paid plan at sign-up.
- On the Free plan you are not charged. It lasts up to 6 months, or until the credits are used up, whichever comes first. Then the account closes; AWS keeps your data for 90 days, and you can upgrade to the Paid plan in that time to continue.
- Credits pay for usage. You can't withdraw them as cash or move them to another account.
- Only new customers get the credits. If you already have, or ever had, an AWS account, you are not eligible. Each AWS account also needs its own email address.
Figure 6. Credits for new accounts: $100 at sign-up plus up to five $20 activities, up to $200. The Free plan runs up to 6 months or until the credits are used up.
Worked example 1: adding up the credits.
- Sign-up credit: $100.
- You finish 3 activities (EC2, budget, RDS): 3 × $20 = $60.
- Total so far: $100 + $60 = $160.
- Finish the other 2: + 2 × $20 = $40. Total $200.
Worked example 2: how long does $100 last for one small server? (AWS's on-demand Linux price for t3.micro in N. Virginia, October 2026: $0.0104 per hour.)
- One month ≈ 30 days × 24 hours = 720 hours.
- 720 × $0.0104 = $7.488 per month for the server, if it runs all the time.
- Six months: 6 × $7.488 = $44.93.
- So $100 covers one small server for the whole 6 months, with room left for disks and practice. (Disks and other services cost extra, so always check the Billing console.)
Correction
In class the credits were explained as "$200 total, $100 first and the next $100 after you use the first". The real rule: $100 at sign-up, and the next $100 is earned by completing the 5 activities, $20 each. It doesn't unlock by spending. Also dropped from class: the claim that AWS checks your browser history. AWS says only that the credits are for new customers; it doesn't publish how it checks.
14. Regions in the console, and enabling an opt-in Region
Why. Your server is launched in whatever Region is selected at the top right of the console. Pick the wrong one and you "lose" your server.
What. The isolation demo from class:
- The Region menu showed US West (Oregon). A server launched now would sit in an Oregon data center.
- Switch to Asia Pacific (Mumbai)
ap-south-1: the Instances page lists only the Mumbai servers. - Switch to US East (N. Virginia)
us-east-1: a different list. - The servers didn't vanish. Each Region shows only its own resources. Regions are isolated.
Worked example.
- You launch 2 servers in Mumbai and 1 in N. Virginia.
- Region = Mumbai: the list shows 2.
- Region = N. Virginia: the list shows 1.
- The bill counts all 3 (section 15).
Default and opt-in Regions. Regions that AWS launched after 20 March 2019 are opt-in: they are off until you enable them. In class the table showed Cape Town, Hyderabad and Melbourne as Disabled, and older Regions as Enabled by default.
How to enable one.
- Click your account name at the top right.
- Choose Account (it opens in Billing and Cost Management).
- Scroll to AWS Regions.
- Select the Region, for example Asia Pacific (Hyderabad), and choose Enable.
- Wait: usually minutes, sometimes a few hours. Enabling is free.
Correction
In class, enabling a Region was linked to "sharing data with the government". That is not the reason. AWS simply made every Region launched after 20 March 2019 opt-in, so accounts don't get new Regions switched on without asking. The Region counts from class are dropped; they change as AWS adds Regions.
15. One global bill, paid later: set a budget alert
Why. AWS is post-paid: you use first and pay later. A forgotten server keeps adding to the bill every hour.
What.
- The Billing console shows Global: one bill for all Regions together.
- AWS bills monthly. The bill goes to your payment method.
- If a bill stays unpaid, AWS can suspend the account: you lose access to your servers and data. AWS's own help page says you must clear the dues within 30 days of suspension, or AWS closes the account; after a post-closure period the content is deleted. The agreement also allows interest on late payments. You still owe the money.
How: create a budget alert (this is also one of the $20 activities).
- Open Billing and Cost Management → Budgets → Create budget.
- Choose Use a template (simplified) → Monthly cost budget.
- Enter an amount, for example $5.
- Enter your email address.
- Choose Create budget. AWS emails you when your costs cross the limits the template sets.
Worked example: how fast a forgotten server adds up.
- You forget one
t3.microrunning in N. Virginia: $0.0104 per hour. - One day: 24 × $0.0104 = $0.2496.
- One month: 720 × $0.0104 = $7.488.
- Forget 10 of them for a month: 10 × $7.488 = $74.88. A $5 budget alert would warn you in the first few days.
Correction
In class it was said that if you ignore a big bill "nothing happens". That's wrong. Unpaid bills lead to suspension, then closure and deletion, and the debt stays. Always set a budget alert and delete what you don't use.
16. Why we practise in N. Virginia, and economy of scale
Why. For practice you want the Region with the most capacity and usually low prices.
What. US East (N. Virginia), us-east-1:
- It is AWS's first Region, launched in 2006.
- It has 6 Availability Zones, more than most Regions.
- Its prices are usually among the lowest. Prices are per Region, so always check the EC2 pricing page.
Worked example: real prices, October 2026 (on-demand Linux t3.micro, AWS's published price data).
| Region | Price per hour | 720 hours (1 month) |
|---|---|---|
| US East (N. Virginia) | $0.0104 | 720 × 0.0104 = $7.488 |
| Asia Pacific (Mumbai) | $0.0112 | 720 × 0.0112 = $8.064 |
- Difference per server per month: $8.064 − $7.488 = $0.576.
- For 100 servers: 100 × $0.576 = $57.60 per month.
- For learning, $0.58 is small. For a company with thousands of servers, it adds up. But a company with users in India may still choose Mumbai for speed (remember latency from the last chapter).
Economy of scale. The bigger the operation, the lower the cost of each unit. AWS buys hardware, power and network in huge amounts, so each server-hour costs it less, and AWS has cut its prices many times over the years.
The class analogies (all suppose examples to understand the idea, not real price history):
- Biscuit packet. Suppose a 10-rupee biscuit packet had 100 g. The company grows and makes much more, so its cost per gram falls. Now 10 rupees gets you 120 g.
- Toothpaste. Suppose a 20-rupee tube had 50 g, and at bigger scale it gives 70 g for the same 20 rupees.
- Dividend. When a company earns more, it shares some of the profit with its shareholders as a dividend. When a cloud grows, it can share some of the saving with customers as lower prices.
- Board numbers. Suppose a server cost $1.00 per hour. At bigger scale it costs $0.70. Saving per hour: $0.30. For 720 hours: 720 × $0.30 = $216 per month, per server.
Correction
In class, higher prices in Mumbai were explained by taxes and import costs. AWS doesn't publish why prices differ by Region, so we don't guess. Just compare on the pricing page. The investment figure mentioned in class is dropped because it couldn't be checked.
17. EC2 = Elastic Compute Cloud
Why. Every service name in AWS is a short form. Once you can read the name, you know what the service does.
What. Reading the name like a film title. You know how Kabhi Khushi Kabhie Gham is written as K3G, because "K" comes three times? AWS does the same:
- Elastic Compute Cloud: E + C + C. The C comes twice, so EC2.
- Simple Storage Service: S three times, so S3.
Each word:
- Elastic = like a rubber band. It stretches and comes back. Traffic goes up, you add capacity. Traffic goes down, you remove it.
- Compute = processing, the work a CPU does: adding 2 + 3 = 5, resizing an image, running an app.
- Cloud = the machine is in an AWS data center, not on your desk. You use it over the internet.
Classroom line
Traffic went up? Increase capacity. Traffic went down? Reduce capacity.
Class मधलं वाक्य
Traffic वाढलं की capacity वाढवा, traffic कमी झालं की capacity कमी करा.
Classroom line – हिंदी
"Traffic badh gaya capacity badhao, traffic kam ho gaya capacity kam kar do."
Worked example: elastic in numbers (suppose).
- On a normal day your site needs 2 servers.
- During a big sale, traffic is 5 times higher: 2 × 5 = 10 servers.
- After the sale you go back to 2.
- Suppose each server costs $0.0104 per hour, and the sale lasts 48 hours. Extra cost: 8 extra servers × 48 hours × $0.0104 = $3.99. You pay for the extra 8 only during those 48 hours.
18. The orange button: think before you click
Why. In the EC2 console the main action is an orange button: Launch instance. Launching starts something that may cost money.
How to reach it.
- In the console search bar type
ec2, and open EC2. - The EC2 dashboard opens. Look for the orange Launch instance button.
The traffic signal analogy. Red means stop. Green means go. Orange means: slow down, look, think. Treat every orange button in AWS like that.
Classroom line
Click the button only after thinking it through; there may be charges after that.
Class मधलं वाक्य
विचार करूनच button वर click करा, पुढे charges लागू शकतात.
Classroom line – हिंदी
"Soch samajh ke button pe click karna aage charges lag sakte hai."
Classroom line
Red means stop... orange means look, and green means go.
Class मधलं वाक्य
"Thamba red jhala... Orange paha aani hirva jaa."
लाल झाला की थांबा... नारंगी म्हणजे बघा, आणि हिरवा म्हणजे जा.
Classroom line
Red means stop... orange means look, and green means go.
19. The 7 launch steps
Why. Before the class saw the screen, we asked: what do you need to start a server? Students said: Region, RAM, operating system, storage, security group, key pair. That is almost the whole launch page. AWS groups it into 7 parts (plus the Region you choose first).
Figure 7. Animation: the highlight moves through the 7 parts of the launch page, then the orange Launch instance button.
- Name and tags
- AMI: the operating system image
- Instance type: how many CPUs and how much RAM
- Key pair: how you will log in
- Network settings: the security group (firewall)
- Storage: the disk
- Number of instances
Then: Launch instance. The next sections take one step at a time.
20. Step 1: Name and tags
Why. AWS gives every server an ID like i-0123456789abcdef0. Nobody remembers which app runs on i-0123… and which on i-0fed….
What. The name is optional, but always give one. The name is really a tag: a label with a key Name and a value you choose.
How.
- In Name and tags type a name that says what the server does, for example
my-first-server. - In class the name was "pehli wali", "the first one". Any clear name works.
Worked example.
- Suppose a company runs 30 servers: 10 web, 10 app, 10 database.
- Without names: 30 random IDs. To find the database servers you open all 30.
- With names like
web-1…web-10,app-1…app-10,db-1…db-10, you filter bydband see the 10 at once.
21. Step 2: AMI, the operating system image
Why. A server needs an operating system before it can do anything.
What. AMI = Amazon Machine Image. It is a ready-made image that AWS copies onto your new server's disk: the operating system, and sometimes software too.
The group-photo analogy. A group photo captures everyone at one moment. An AMI captures a machine at one moment: the OS, the folders and the files, packed like a zip. Every server launched from it starts exactly like that photo.
What you see in the console (Quick Start): Amazon Linux, macOS, Ubuntu, Windows, Red Hat, SUSE Linux, Debian. Some AMIs carry a Free tier eligible label.
How.
- Keep the default: Amazon Linux 2023 AMI, marked Free tier eligible.
- Leave the architecture at the default (64-bit x86).
Worked example.
- Suppose you prepare 1 server with your website installed and save it as your own AMI.
- Tomorrow you need 5 more web servers. You launch 5 from that AMI.
- All 5 start with the website already installed. Setup time: once, not 6 times.
Correction
On the board the OS image file type was written ".osi". The common disk-image file is .iso. And remember: macOS servers are never part of the free offer; they run only on dedicated Mac hosts (section 25).
22. Step 3: Instance type (CPU and RAM)
Why. Different apps need different power. A small blog needs a little; a big database needs a lot. The instance type decides CPU and RAM, and also the price.
What. Reading a name: t3.micro.
t= the family (here: burstable general purpose).3= the generation.micro= the size.
Other families from the board: c (compute-heavy work), r (memory-heavy work), i (storage-heavy work), f (special FPGA hardware). A vCPU is a virtual CPU. Think of a quad-core or octa-core phone: more cores, more work at the same time.
The T2 table (correct values, from AWS's T2 page):
| Type | vCPU | RAM (GiB) |
|---|---|---|
| t2.nano | 1 | 0.5 |
| t2.micro | 1 | 1 |
| t2.small | 1 | 2 |
| t2.medium | 2 | 4 |
| t2.large | 2 | 8 |
| t2.xlarge | 4 | 16 |
| t2.2xlarge | 8 | 32 |
There is no t2.3xlarge. Look at the RAM column: each step doubles it. 0.5 → 1 → 2 → 4 → 8 → 16 → 32.
Figure 8. T2 sizes: RAM doubles at each step, from 0.5 GiB (nano) to 32 GiB (2xlarge). The bars are to scale.
Which types are "free"? It depends on when the account was created:
| Account created | Instance types marked Free tier eligible |
|---|---|
| before 15 July 2025 | t2.micro, t3.micro |
| on or after 15 July 2025 | t3.micro, t3.small, t4g.micro, t4g.small, c7i-flex.large, m7i-flex.large |
So in a new account the default is t3.micro: 2 vCPU, 1 GiB. That is what the class console showed.
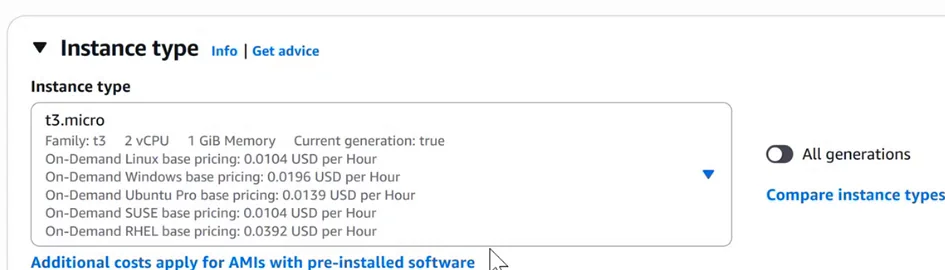
From the class demo: The launch page picked t3.micro: family t3, 2 vCPU, 1 GiB memory. On-demand Linux price 0.0104 USD per hour (N. Virginia).
Worked example 1: RAM doubling.
t2.microhas 1 GiB. Go up 3 sizes: micro → small → medium → large.- 1 × 2 × 2 × 2 = 8 GiB. Check the table: t2.large = 8. ✓
Worked example 2: price of one month (N. Virginia, Linux, on-demand).
t2.micro: $0.0116 per hour × 720 = $8.352.t3.micro: $0.0104 per hour × 720 = $7.488.- The newer
t3.microgives 2 vCPU instead of 1, and costs $0.864 less per month.
Correction
The t2 list on the board had wrong vCPU values and a "t2.3xlarge" that doesn't exist. Use the table above. Also, t2.micro is no longer on the free list for accounts created on or after 15 July 2025; use t3.micro.
23. Step 4: Key pair (login)
Why not just a password? Passwords can be guessed. Automated bots keep trying common passwords against servers on the internet. So for Linux servers AWS uses a key pair instead.
Classroom line
If I put a password on the server, anyone can try to crack that password.
Class मधलं वाक्य
मी server ला password ठेवला, तर कोणीही तो password crack करायचा प्रयत्न करू शकतो.
Classroom line – हिंदी
"Agar mai password rakhunga server ko to koi bhi password crack kar sakta hai."
What. A key pair is two matching keys:
- The public key: AWS puts it on the server when it launches.
- The private key: a file that downloads to your laptop. Only you keep it.
What the key pair does, exactly.
- Authentication. When you connect with SSH, the server sends a challenge. Only the matching private key can answer it. The private key itself never travels over the network.
- Encryption. After you are let in, SSH and the server agree on a temporary session key, and every command and reply is encrypted with it.
Figure 9. Step 1: the private key on your laptop proves who you are by answering the server's challenge. Step 2: a temporary session key encrypts everything you send. The private key never leaves your laptop.
Choices in the Create key pair window.
| Field | Options | What to pick |
|---|---|---|
| Key pair type | RSA or ED25519 (two key-making algorithms) | RSA (works for Linux and Windows; ED25519 is Linux only) |
| Private key file format | .pem (for OpenSSH) or .ppk (for PuTTY) | .pem |
Which file for which laptop? (the board)
- Windows + PowerShell (newer than the old CMD):
.pem. Windows 10 (from version 1809, in 2018) and Windows 11 have Microsoft's OpenSSH client; ifsshis missing, add OpenSSH Client under Settings → Optional features. - Windows + PuTTY:
.ppk. In the past Windows had no good built-in SSH, so PuTTY was common. PuTTYgen can convert.pem↔.ppk. - Mac (Terminal):
.pem. - Linux (terminal):
.pem.
So in most cases today: RSA + .pem.
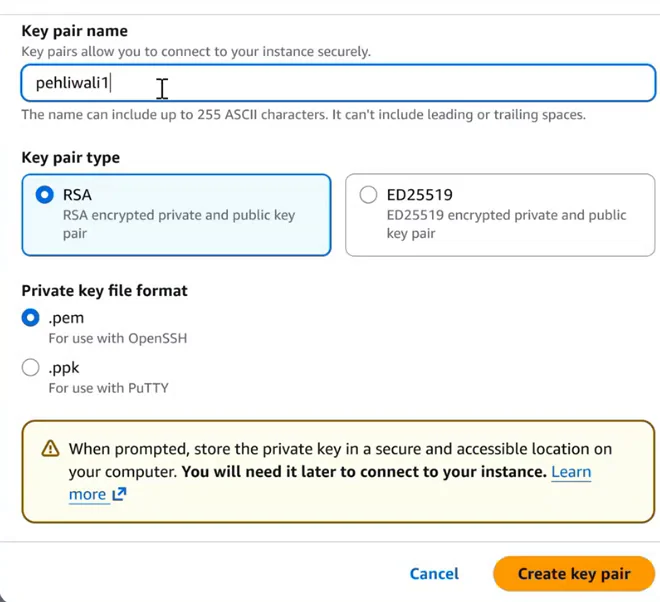
From the class demo: Create key pair: name pehliwali1, type RSA, file format .pem (for OpenSSH). .ppk is for PuTTY. AWS warns to store the private key safely because you need it later.
How.
- In Key pair (login) choose Create new key pair.
- Name it the same as the server, for example
my-first-server. (In classpehliwalialready existed, so AWS said "Key pair already exists", and the name becamepehliwali1.) - Type: RSA. Format: .pem.
- Choose Create key pair. The file
my-first-server.pemdownloads, usually to your Downloads folder, and is selected for the server. - This is the only download. AWS gives you the private key file only this once. Move the file to a safe folder.
- On Mac or Linux, lock the file so only you can read it:
chmod 400 my-first-server.pem. SSH refuses keys that others can read.
Classroom line
Whatever name we give the server, we give the key pair the same name.
Class मधलं वाक्य
जे नाव आपण server ला देतो, तेच नाव key pair ला देतो.
Classroom line – हिंदी
"Jo naam hum server ka rakhte hai na, wahi naam key pair ka rakhte hai."
Classroom line
Without the key pair file we cannot log in to the server.
Class मधलं वाक्य
Key pair file शिवाय आपण server मध्ये login करू शकत नाही.
Classroom line – हिंदी
"Bina key pair file hum server ko login nahi kar sakte."
Worked example: 2048 bits.
- An RSA key from AWS is 2048 bits long. 2048 ÷ 8 = 256 bytes.
- A 2048-bit number can have about 2²⁰⁴⁸ values, a number with 617 digits.
- A 12-character password, even from 95 keyboard characters, has 95¹² ≈ 5.4 × 10²³ possibilities, a number with only 24 digits.
Correction
In class the key was described as a "1024 or 2048 character password". The right unit is bits, not characters: AWS creates 2048-bit RSA keys. And the key pair is mainly for proving who you are; the encryption of the session uses a separate temporary session key.
24. Step 5: Network settings and the security group
Why. Ports are the doors of a server (remember ports from the IP chapter). Attackers try open doors all day. A security group is the firewall that decides which doors are open, and for whom.
Classroom line
If you go to sleep leaving your house door open, anyone can come in and steal.
Class मधलं वाक्य
घराचं दार उघडं ठेवून झोपलात, तर कोणीही येऊन चोरी करून जाईल.
Classroom line – हिंदी
"Agar aap ghar ka darwaza khulla chhod ke so jaoge, to koi bhi aake chori karke jayega."
What.
- Inbound rules = traffic coming into the server. A new security group has no inbound rules, so everything is blocked until you add a rule.
- Outbound rules = traffic going out. A new security group allows all outbound traffic.
- Each inbound rule has a type, a port and a source (who may connect).
The board rules:
| Type | Port | Source | Meaning |
|---|---|---|---|
| HTTP | 80 | 0.0.0.0/0 | anyone can open your website |
| HTTPS | 443 | 0.0.0.0/0 | anyone can open your website securely |
| SSH | 22 | 0.0.0.0/0 in class; My IP in real work | log in to manage the server |
What does 0.0.0.0/0 mean? "Every IPv4 address in the world". From our first class: 256 × 256 × 256 × 256 = 4,294,967,296 addresses. All of them may knock on that port.
How (in class).
- In Network settings, keep Create security group.
- Leave Allow SSH traffic from: Anywhere 0.0.0.0/0 ticked. SSH (port 22) is how we will log in next class.
- The console shows a warning: rules with source 0.0.0.0/0 allow every IP address, and AWS recommends allowing only known IP addresses. For real work, change Anywhere to My IP.
- (Later, for a web server, tick Allow HTTP and Allow HTTPS.)
With SSH open to Anywhere, only someone with your private key can log in, but bots will still try all day. My IP shuts them out at the door.
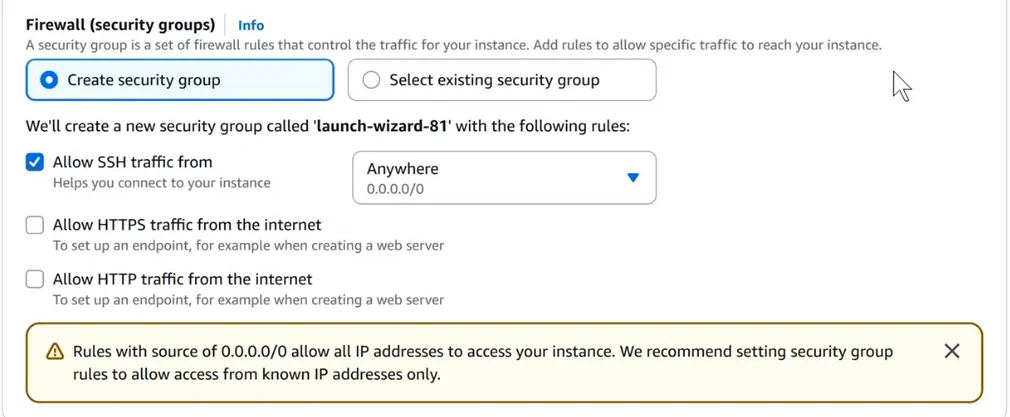
From the class demo: Network settings: Create security group, Allow SSH traffic from Anywhere 0.0.0.0/0. The console warns that 0.0.0.0/0 allows all IP addresses and recommends known IP addresses only.
Figure 10. Animation: packets for ports 22, 80 and 443 have matching inbound rules and reach the server. A packet for port 3306 has no rule and is dropped. Outbound traffic is allowed by default.
Worked example: Anywhere vs My IP.
- Source
0.0.0.0/0: 4,294,967,296 possible addresses can reach port 22. - Source My IP, for example
203.0.113.25/32: exactly 1 address. - That is 4,294,967,296 times fewer addresses that can even try.
25. Step 6: Storage (the disk)
Why. RAM forgets everything when the power goes. The OS, your files and your database must live on a disk.
What. The server's main disk is an EBS root volume.
- Amazon Linux 2023: the default is 1 × 8 GiB gp3. Linux without a desktop is small, so 8 GiB is enough to start.
- Windows Server base AMIs: 30 GB root volume.
- macOS: runs only on EC2 Mac dedicated hosts (real Mac minis), with a 24-hour minimum. Not part of any free offer.
How. Keep 1 × 8 GiB gp3.
Worked example: how many such disks fit in 30 GB?
- Suppose you have 30 GB to use for disks.
- One Linux server needs 8 GiB.
- 30 ÷ 8 = 3.75, so 3 Linux servers.
- One Windows server needs 30 GB alone: 1 Windows server.
Correction
In class, Windows and Mac were said to need 20 GB. Windows Server base AMIs use 30 GB, and macOS needs a dedicated Mac host.
26. Step 7: Number of instances
Why. Sometimes you need many identical servers at once.
What. Type a number, and AWS launches that many servers with exactly the same settings. 10 means 10 identical servers.
But there is a limit. New accounts have service quotas. For on-demand servers the quota is counted in vCPUs per Region, not in number of servers. If you need more, request an increase in the Service Quotas console.
Worked example (suppose quota).
- Suppose your quota is 16 vCPUs in N. Virginia.
t3.microhas 2 vCPUs.- 16 ÷ 2 = 8 servers at most.
- Ask for 10: AWS refuses the launch. Ask for 8: it works.
How (in class). Keep 1.
Correction
The class story that shopping returns on Amazon affect your AWS limits is dropped; there is no such link. Limits are AWS service quotas, and you can see and raise them in the Service Quotas console.
27. Launch, view, and check the Region
How.
- Check the Summary box on the right: 1 instance, Amazon Linux 2023, t3.micro, new security group, 1 volume of 8 GiB.
- Click the orange Launch instance. Think first (section 18).
- A green success message appears. Click View all instances.
- Your server shows Instance state: Running. The Status check shows Initializing for a few minutes, then "checks passed".
- Look at the top right: N. Virginia,
us-east-1. You are sitting in India, and your server is running in a data center in the USA.
Worked example: billing starts at Running.
- Billing is per second, with a 1-minute minimum each time the server starts.
- Suppose you keep it running for 10 minutes: 10 ÷ 60 × $0.0104 = $0.0017.
- Suppose you keep it for 30 seconds: you still pay for 1 minute: 1 ÷ 60 × $0.0104 = $0.00017.
28. Stop or terminate?
Why. When you finish practice, you must decide: switch it off, or delete it.
What.
- Stop = power off. You can Start it again later. You don't pay for server time while it's stopped, but you still pay for its EBS disk. (After a start it usually gets a new public IP address, the dynamic IP from our first class.)
- Terminate = delete. The server is gone for good, and by default its root disk is deleted too. You stop paying for it as soon as it starts shutting down.
Classroom line
After you stop it, there are no server charges, only the hard disk charges.
Class मधलं वाक्य
"Stop kelyanantar server che charges nahi padat, fakt hard disk che padtat."
Stop केल्यानंतर server चे charges पडत नाहीत, फक्त hard disk चे पडतात.
Classroom line
After you stop it, there are no server charges, only the hard disk charges.
Figure 11. Running: server time and disk are billed. Stopped: only the EBS disk is billed, and you can start again. Terminated: the server and its root disk are deleted, nothing more is billed.
How to terminate (as in class).
- Select the server (tick the box).
- Instance state → Terminate (delete) instance.
- Confirm.
- The state changes to Shutting-down, then Terminated. After a while it disappears from the list.
Worked example: what does a stopped server cost? (AWS's EBS pricing page uses $0.08 per GB-month for gp3 as its example rate; check your Region.)
- Stopped for a month, 8 GiB disk: 8 × $0.08 = $0.64.
- Running for a month: $7.488 (server) + $0.64 (disk) = $8.128.
- Terminated: $0.
- So: stop if you will use it again soon; terminate if you're done.
29. Homework
Classroom line
From tomorrow I am starting Linux. Everyone needs an AWS account.
Class मधलं वाक्य
"Udya pasun Linux chalu kartoy mi. AWS account pahije saglyankade."
उद्यापासून मी Linux चालू करतोय. सगळ्यांकडे AWS account पाहिजे.
Classroom line
From tomorrow I am starting Linux. Everyone needs an AWS account.
Try at home
Task 1: your account, safely
- Create your own AWS account (Sign up for AWS (advanced)) with your own email.
- Turn on MFA for root, with 2 devices if you can (authenticator app + passkey).
- Write your 12-digit account ID in your notebook, not in any screenshot.
Task 2: credits and budget
- On Console Home, find the Explore AWS box and your credit balance.
- Create a monthly cost budget of $5 with your email. (That is $20 of credits earned.)
- Write: how many months are left on your Free plan?
Task 3: launch and delete
- Region: US East (N. Virginia).
- Launch 1 server: Amazon Linux 2023, t3.micro, new RSA .pem key pair named like the server, SSH from My IP, 8 GiB gp3.
- Wait for Running, then terminate it.
- Calculate: if you had forgotten it for 3 days, what would it cost at $0.0104 per hour? (Answer: 3 × 24 × 0.0104 = $0.7488.)
Task 4: tables from memory
- Write the T2 table (vCPU and RAM) from nano to 2xlarge.
- Write the 7 launch steps in order.
Next class: Linux. Keep your AWS account ready and your .pem file safe.
Ravindra Bagale's Tip
In interviews, when they ask "how do you secure an AWS account?", answer in this order: "I lock the root user with MFA and don't use it daily, I give each person an own IAM user with least privilege and MFA, I set a budget alert, and I never open SSH to 0.0.0.0/0 in production." Four lines, and each one shows you know why.
Recap
In short
- Practise in your own account; errors teach you.
- Root user = the owner's email login, full access, MFA required. Use it only for root-only tasks.
- IAM users = one per person, least privilege, own password (forced change at first sign-in), MFA.
- Shared logins kill accountability; with own IAM users the record names the person.
- If an IAM user is hacked, root deletes or disables it. Never save the root password in a browser.
- IAM sign-in needs the account ID (12 digits) or alias + user name + password.
- MFA types: passkey or security key (best), authenticator app, hardware TOTP token. TOTP = secret seed + clock, a new 6-digit code every 30 s. No SMS.
- Lost MFA: root uses alternative factors (email + phone call); an IAM user asks the admin.
- New accounts: $100 + up to $100 from 5 activities of $20; Free plan up to 6 months.
- Regions are isolated; opt-in Regions (after 20 March 2019) are enabled from Account → AWS Regions.
- One global, post-paid bill. Set a budget alert. Unpaid bills lead to suspension.
- N. Virginia: first Region (2006), 6 AZs, usually low prices: t3.micro $0.0104/h vs Mumbai $0.0112/h.
- EC2 = Elastic Compute Cloud. 7 steps: name, AMI, instance type, key pair, security group, storage, count.
- T2: nano 1/0.5, micro 1/1, small 1/2, medium 2/4, large 2/8, xlarge 4/16, 2xlarge 8/32. New free types include t3.micro.
- Key pair: RSA 2048-bit, .pem (OpenSSH) or .ppk (PuTTY), download once, chmod 400.
- Security group: inbound closed by default; 80, 443, 22; SSH from My IP in real work.
- Stop = only disk billed; terminate = deleted.
Samjla ka? Aaj ratri account banva, MFA lava, ani ek server launch karun terminate kara. Udya Linux.
Ravindra Bagale, trainer: linkedin.com/in/ravindra-bagale. Mark, the social media app, the employee names, the 10 crore offer, the biscuit and toothpaste numbers and the $1 to $0.70 server are "suppose" examples for learning. AWS facts, prices and Free Tier rules are from AWS's own pages as of October 2026 and change often, so check the live AWS pages before you rely on them.